【TODOアプリ】【Java】HTTP APIの作成 ~ 実装編 ~
TODOアプリ用APIを作成します。Java + Spring Bootを使用して、MySQLサーバーへ登録・閲覧・編集・削除操作を実装します。細かい解説は省くのと、最小構成での実装方法をまとめます。(細かい解説は、別パートで解説したい、、)
実装手順
1. Spring Initializer からプロジェクトの雛形を作成する
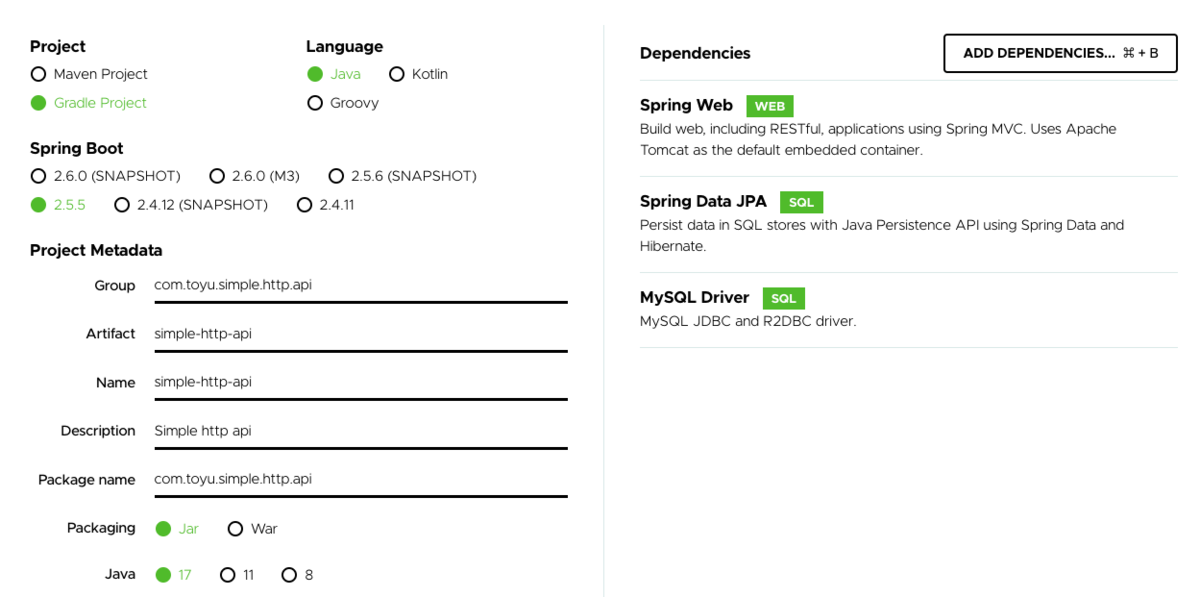
- Spring Boot 2.6.5
- Java 8
* lombok pluginを使用する場合はココをクリック
build.gradleに以下を追記
plugins {
    id 'org.springframework.boot' version '2.5.5'
    id 'io.spring.dependency-management' version '1.0.11.RELEASE'
    id 'java'
    id "io.freefair.lombok" version "6.2.0" <= これを追加
}
Spring Initializerからlombok選択した場合はこの作業をスキップしてください。
2. DB操作のモジュールの作成 (Repository)
データクラスのTaskEntity.javaを作成
@Getter
@Setter
@ToString
@Builder
@NoArgsConstructor
@AllArgsConstructor
@Entity
@Table(name = "tasks")
public class TaskEntity {
    @Id
    @GeneratedValue(strategy = GenerationType.IDENTITY)
    private Long id;

    private String title;

    private String description;
}
DB操作クラスのTaskRepository.javaを作成
public interface TaskRepository extends JpaRepository<TaskEntity, Long> {
}
3. HTTPルーティング用のモジュール作成 (Controller)
@RestController
@AllArgsConstructor
@RequestMapping("/tasks")
public class TaskController {
    // 上で作ったDB操作用モジュール
    private final TaskRepository repository;

    // 登録用
    @PostMapping
    @ResponseStatus(HttpStatus.CREATED)
    public TaskEntity createTask(@RequestBody CreateTaskRequest request) {
        val entity = TaskEntity.builder()
                               .title(request.getTitle())
                               .description(request.getDescription())
                               .build();
        return repository.save(entity);
    }

    // 一覧閲覧用
    @GetMapping
    public List<TaskEntity> getTasks() {
        return repository.findAll();
    }

    // 閲覧用
    @GetMapping("/{id}")
    public TaskEntity readTask(@PathVariable("id") Long id) {
        return repository.findById(id)
                         .orElseThrow(() -> new ResponseStatusException(HttpStatus.NOT_FOUND, "Data Not Found"));
    }

    // 編集用
    @PutMapping("/{id}")
    public TaskEntity updateTask(@PathVariable("id") Long id,
                                 @RequestBody CreateTaskRequest request) {
        val entity = repository.findById(id)
                               .orElse(TaskEntity.builder()
                                                 .title(request.getTitle())
                                                 .description(request.getDescription())
                                                 .build());
        return repository.save(entity);
    }

    // 削除用
    @DeleteMapping("/{id}")
    public void deleteTask(@PathVariable("id") Long id) {
        repository.deleteById(id);
    }
}
4. 設定ファイルを作成 (application.yml)
DB用のテーブル定義ファイル src/main/resources/sql/DDL.sql を作成
CRETATE DATABASE IF NOT EXISTS http_api_db;

CREATE TABLE IF NOT EXISTS `http_api_db`.`tasks`
(
    `id`          INT(11) PRIMARY KEY AUTO_INCREMENT,
    `title`       TEXT NOT NULL,
    `description` TEXT NOT NULL
) ENGINE = InnoDB
  CHARACTER SET utf8mb4
;
アプリケーション設定ファイル src/main/resources/application.ymlを作成
server:
  port: 8080

logging:
  file:
    name: "log/main.log"
  level:
    com.toyu.simple.http.api: DEBUG

spring:
  datasource:
    # 使用するMySQLサーバーの設定に合わせてください
    url: "jdbc:mysql://localhost:3306/http_api_db"
    username: "root"
    password: "rootpass"
    driver-class-name: "com.mysql.cj.jdbc.Driver"
  sql:
    init:
      schema-locations: "classpath:sql"
ローカル環境のMySQL構築方法は、前回の記事をご参考ください。
動作確認 (コマンドライン)
# アプリケーション実行(停止は、Ctrl + c)
$ ./gradlew bootRun
結果> ...(省略)
2021-10-24 15:11:03.121  INFO 58815 --- [           main] o.s.b.w.embedded.tomcat.TomcatWebServer  : Tomcat started on port(s): 8080 (http) with context path ''
2021-10-24 15:11:03.134  INFO 58815 --- [           main] com.toyu.simple.http.api.EntryPoint      : Started EntryPoint in 6.267 seconds (JVM running for 6.742)

# 登録
$ curl -X POST -H 'Content-Type: application/json' -d '{"title": "テストたいとる", "description": "説明をココに"}' http://localhost:8080/tasks
結果> {"id":2,"title":"テストたいとる","description":"説明をココに"}

# 閲覧
$ curl -X GET  http://localhost:8080/tasks/1
結果> {"id":1,"title":"テストたいとる","description":"説明をココに"

# 編集
curl -X PUT -H 'Content-Type: application/json' -d '{"title": "テストたいとる(編集後)", "description": "説明をココに(編集後)"}' http://localhost:8080/tasks/1
結果> {"id":1,"title":"説明をココに(編集後)","description":"description"}

# 削除
$ curl -X DELETE http://localhost:8080/tasks/1